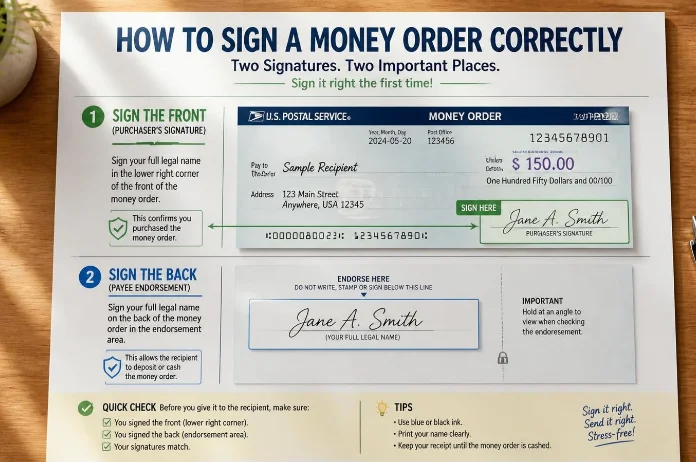
How to Sign a Money Order is simple once you identify the correct signature line. The purchaser normally signs the front, in the area labeled “Purchaser’s Signature” or something similar. You should not sign the endorsement area on the back because that space belongs to the recipient.
Quick answer: To sign a money order, find the purchaser signature area on the front. Sign your usual name there after checking the recipient and payment information. Do not sign the back because the recipient normally uses that area when depositing or cashing the payment.
Money Order Signing at a Glance
| Question | What to Do |
| Who signs it before sending? | The purchaser or sender |
| Where does the purchaser sign? | Designated signature area on the front |
| Should the purchaser sign the back? | No |
| Who normally signs the back? | The recipient when cashing or depositing it |
| What name should you use? | Your normal signature |
| Should you use pencil? | No; use permanent ink |
| Should you keep the receipt? | Yes |
| What if the form looks different? | Follow its printed labels or ask the issuer |
Different issuers use slightly different layouts and labels. You might see “Purchaser’s Signature,” “Purchaser,” “From,” or another similar description. Reading every printed label before writing can prevent an avoidable mistake.
How to Sign a Money Order in 5 Steps
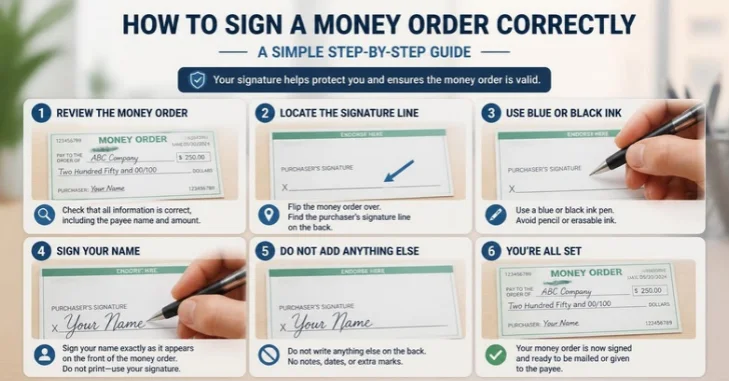
Knowing how to sign a money order requires more than putting your name on a line. First, confirm that the other important fields have the correct information. These five steps cover the process for most U.S. purchasers.
- Find the purchaser signature field. Look on the front for the designated purchaser or signature area.
- Check the recipient’s name. Confirm the payee’s name is spelled correctly before signing.
- Review your information. Check any purchaser, address, memo, or account fields you completed.
- Sign the designated line. Add your normal signature using permanent ink.
- Keep your receipt. Store the receipt until you know the payment reached its recipient.
MoneyGram specifically directs purchasers to sign the designated purchaser signature area. It also warns purchasers not to sign the back. Chase provides similar guidance and identifies the back as the recipient’s signing area.
What You Need Before Signing
Gather the recipient’s correct name before completing the document. You may also need your mailing address and an account or invoice number. Having those details ready reduces the chance of entering incorrect information.
Use a permanent pen rather than a pencil when completing the form. MoneyGram recommends blue or black ink and specifically advises against pencil. Check the printed instructions because requirements can differ between issuers.
If you’re paying a bill, locate your customer or account number beforehand. The form may provide a memo or payment-reference field for that information. Adding the reference helps the receiving company identify which account should receive the payment.
Where Do You Sign a Money Order?
As the purchaser, you generally sign the designated signature area on the front. The exact location and wording can vary between issuers. Look for labels referring to the purchaser, sender, drawer, or signature.
Avoid assuming every form has exactly the same layout. Read the labels before adding your signature or other information. Ask the cashier or issuer for guidance if the correct field remains unclear.
The back serves a different purpose in most cases. It is generally reserved for the payee who receives the payment. Signing that area as the purchaser can create confusion during deposit or redemption.
Should You Sign the Front or Back?
A purchaser normally signs the front, not the back. Chase, MoneyGram, and Huntington all give this instruction in their consumer guidance. The recipient generally uses the endorsement area on the back when collecting the funds.
This distinction matters because the purchaser and recipient have different roles. Your front signature identifies or authorizes your part of the payment process. The recipient’s endorsement relates to receiving the funds.
There is an important difference when you are the recipient rather than the purchaser. For example, USPS tells recipients cashing postal orders at a Post Office not to sign beforehand. They should take identification and sign at the counter before the postal employee.
How to Fill Out the Other Fields Before You Sign
Write the Recipient’s Name
Find the line labeled “Pay to,” “Pay to the Order Of,” or similar wording. Write the recipient’s correct name in that field. The recipient may be an individual, company, landlord, government office, or another organization.
Check the spelling before continuing to other fields. Using the name provided by the recipient can reduce problems when they deposit or cash the payment. Avoid leaving the payee field blank after purchasing the instrument.
Add the Purchaser Information
Look for a field labeled “Purchaser,” “From,” “Sender,” or similar wording. Enter the information requested by the issuer in that section. Some forms may request your name, address, or both.
Don’t put the recipient’s details into a field specifically requesting purchaser information. The purchaser is the person sending the funds. Reading the field labels carefully is more reliable than copying another issuer’s layout.
Complete the Memo or Account Field
The memo field can identify what your payment covers. For example, a renter could identify the applicable rent period. A customer paying a bill could enter the account or invoice number. Someone running an Etsy shop could use the same field to reference a specific customer order when a buyer pays this way.
This detail can be especially useful when a business processes many payments. Chase recommends adding relevant account information when paying a bill. The reference can help the recipient connect your payment with the correct account.
Review Everything Before Signing
Read the completed form from top to bottom before adding your signature. Check names, addresses, account numbers, and other handwritten information. This short review may save you from having to resolve an error later.
Don’t use correction fluid or casually overwrite a serious mistake. MoneyGram notes that visible alterations may cause acceptance problems. Its guidance recommends pursuing cancellation and replacement when a significant error has been made.
What Happens If You Sign the Wrong Place?
Don’t add another signature immediately if you accidentally used the wrong field. Contact the issuer or return to the location where you purchased the instrument. Explain the mistake and ask whether it can still be used.
Policies can differ depending on the company that issued the payment. A cashier may advise you to replace an incorrectly completed instrument. Replacement or cancellation can sometimes involve additional procedures or fees.
Never alter important payment information simply to make the form appear correct. Cross-outs and correction fluid can create questions about whether the document was changed improperly. Getting issuer-specific instructions is the safer approach.
What If You Receive a Money Order?
Recipients follow a different signing process from purchasers. If you’re receiving the funds, don’t use the purchaser signature field. Your endorsement normally belongs in the designated area used for cashing or depositing the payment.
Check the institution’s instructions before endorsing it. Banks and other financial institutions can have procedures governing when and how customers endorse payment instruments. Waiting until you’re ready to deposit or cash it can help avoid unnecessary problems.
USPS gives particularly clear instructions for postal payments cashed at Post Offices. The recipient should bring an acceptable primary photo ID and leave the document unsigned beforehand. The customer then signs it at the counter in front of a postal employee.
USPS Money Orders: What U.S. Consumers Should Know
USPS sells domestic postal orders at Post Offices and other authorized postal locations. A single domestic postal instrument cannot exceed $1,000. Customers purchasing $3,000 or more in a day face additional identification and reporting requirements.
Current USPS consumer information lists different purchase fees based on the payment amount. The USPS page currently lists $2.65 for amounts through $500 and $3.75 for $500.01 through $1,000. Prices can change, so check USPS before purchasing.
USPS also provides security information for people receiving postal payments. Current designs include security features intended to help recipients identify genuine instruments. USPS advises consumers to examine these features before accepting a postal payment.
Common Signing Mistakes to Avoid
One frequent mistake is signing the endorsement area instead of the purchaser field. Another is completing the document without checking the recipient’s spelling. Both errors can complicate an otherwise straightforward payment.
Purchasers should also avoid leaving important fields blank after buying the instrument. Complete the recipient information promptly and review everything before delivery. Keep the purchase receipt somewhere safe after completing the form.
Don’t discard the receipt as soon as you mail or hand over the payment. The receipt can contain information useful for tracking or handling a problem. MoneyGram, Chase, and other financial sources recommend keeping this proof of purchase.
Money Order vs. Personal Check: Why Signing Is Different
A personal check draws funds from the account connected to that check. A prepaid payment instrument works differently because you provide the funds when purchasing it. This distinction is one reason people without personal checks may use this payment method.
The forms also assign specific areas to the purchaser and recipient. That makes following the printed labels especially important. Don’t assume the endorsement rules match every check or financial document you’ve previously used.
This payment method can be useful for rent, bills, side-job payments, or other situations requiring a paper payment. Still, confirm that the recipient accepts it before purchasing one. You should also verify any account information they require with the payment.
Final Checklist Before Sending It
Before handing over or mailing your payment, check every completed field one last time. Confirm the recipient’s name, purchaser information, reference details, and signature. Make sure you haven’t accidentally signed the recipient’s endorsement area.
Keep the receipt and any tracking information after sending the payment. Contact the issuer promptly if the document becomes lost or you discover a serious mistake. These simple precautions can make resolving a payment problem much easier.
Frequently Asked Questions
How do I sign a money order correctly?
To learn how to sign a money order correctly, first locate the purchaser signature area on the front. Add your normal signature only where the form instructs the purchaser to sign. Leave the endorsement area on the back for the recipient.
Does the purchaser sign the front or back?
The purchaser generally signs the front in the designated signature field. The recipient normally signs the endorsement area when cashing or depositing the payment. Always follow the specific issuer’s printed instructions.
Do I sign a USPS money order before cashing it?
If you’re the recipient cashing a USPS postal order at a Post Office, USPS says not to sign it beforehand. Bring acceptable primary photo identification and sign at the counter. A postal retail associate should witness your signature.
What name should I put in the purchaser section?
The purchaser section contains information about the person sending the payment. Enter the name and other details requested by the particular issuer. Don’t substitute the recipient’s information when the field specifically asks for purchaser details.
What should I do if I make a mistake?
Stop before crossing out, covering, or rewriting important information. Ask the issuing company or seller whether you need a replacement or cancellation. Requirements and possible fees depend on the issuer.
Should I keep the receipt?
Yes, keep the receipt until you’ve confirmed the payment was successfully received and processed. It provides useful purchase information if the document becomes lost or another problem occurs. Store it separately from the payment itself.